I forged steel!

I recently attended an introductory blacksmithing class at Adam’s Forge. I walked in with no experience and no idea what we would be making (the class description is tantalizingly vague). Four hours later, I emerged with my own forged steel bottle opener!


The class began by covering important safety topics, like how the steel inside the forge would reach 1600 F, and that even after you take it out and it cools from hot yellow to orange to red to dull grey, it is still 900 F and “will give you a blister.” We learned to use tongs to manipulate the steel bars and carry them safely between forge and vise or anvil. We also used safety glasses and earplugs (four blasting forges and ten hammering smiths makes a lot of ruckus).

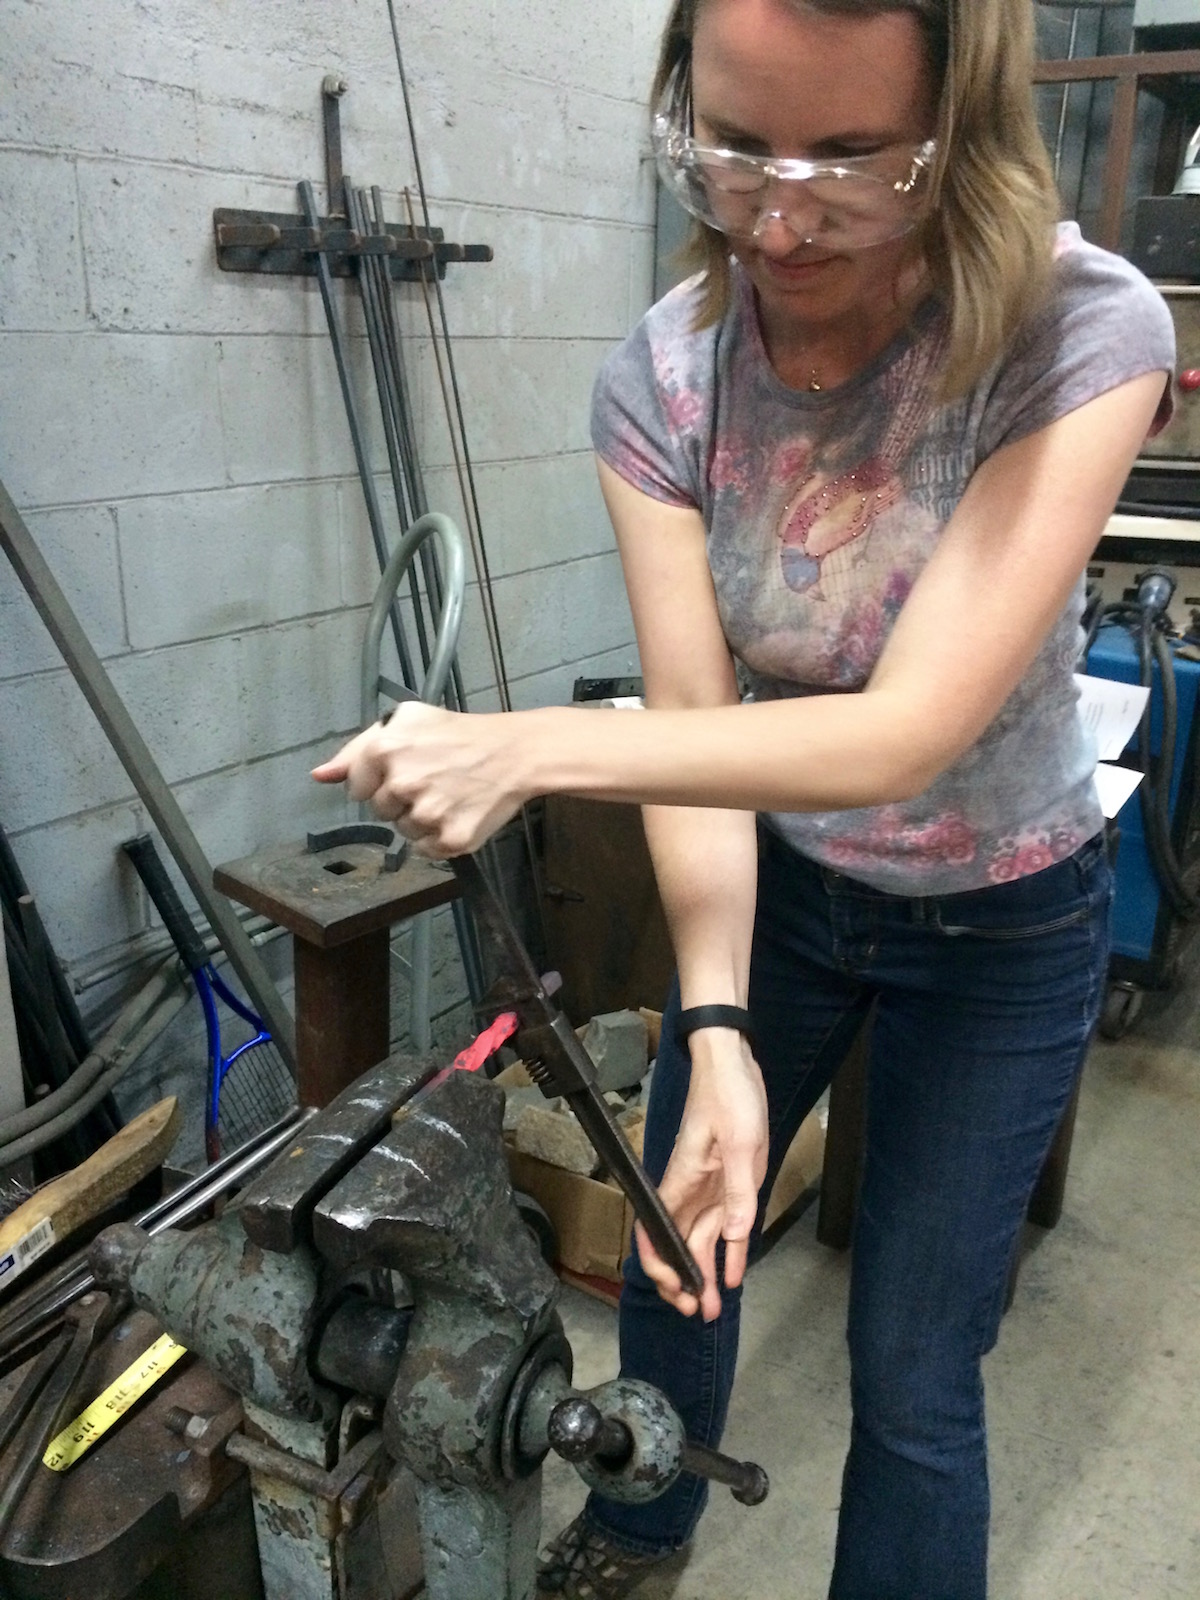
The first step was to create the lovely twisted handle. This was actually the easiest part of the project. I was given a steel bar (7″ long and 3/8″ square). I heated the steel bar in the forge, then clamped it in a vise. I placed a wrench three inches from the vise and then twisted several times to wind the bar.

“While hot, steel feels like thick clay,” our instructor Scott advised, and I found this to be true. It cools off in less than a minute, so if you take too long then it’s back into the forge for another round.

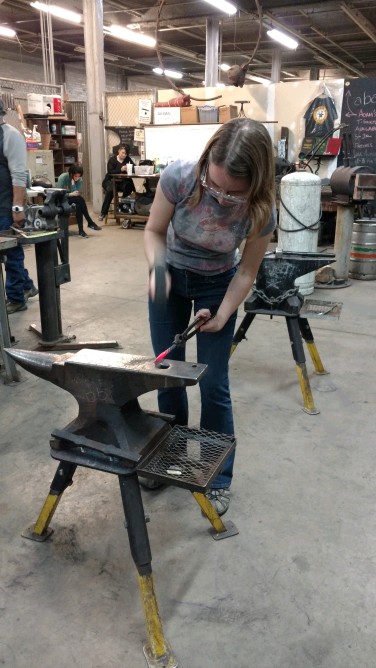
Next, we had to “draw” the steel out on each end. This involves heating a square end of the bar and then pounding it, using the hammer and anvil, to shape it as desired. First you pound on the tip to shape it rather like a chisel point, then work backwards up the bar to progressively thin and shape the end into a wedge. Each time you hit it with the hammer, it spreads out a bit, but it spreads in all directions, so you alternate between hitting the wedge and turning it on its side to pound the bar and maintain its width. Again, you get about 15-20 seconds of pounding time before it has to go back into the forge and be re-heated.

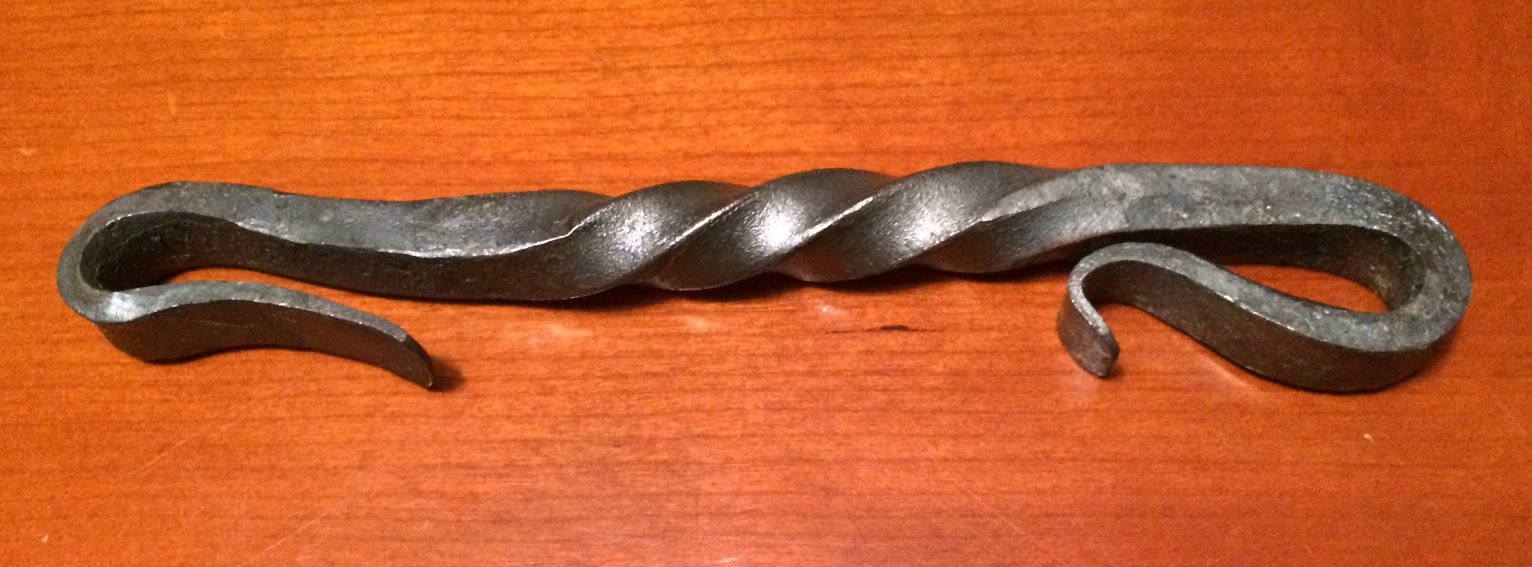
Once the piece had a tapered wedge on each end (this step alone took about 1.5 hours to accomplish), I shaped the wedges into the proper curved pieces. The left end is a hook so the bottle opener can hang from your pocket or other location. The right end is the business end and requires some effort and precision (or luck) to get the hook the right size to snag the edge of a bottle cap, the loop the right length to apply leverage in the center of the cap, and the handle around 45 degrees to make it an ergonomically pleasant and energy-wise efficient operation when removing bottle caps.

One fascinating technique is that you hammer the end curl into the wedge first (bending it over the edge of the anvil), then reheat the tip, dip it in water (to “freeze” the curl) and then pound it over the anvil’s horn to bend the (hot) stem backwards without affecting the (cooler) shaped curl. Nifty!

Also, hot steel oxidizes much faster than room-temperature steel, so as you work, grey dust and chips flake off of the piece. At the end, I used a wire brush to scrape off any loose “scale” and make the piece a little shinier (about the luster of pencil lead).

Today I got the opportunity to try out my new device on a bottle of root beer. IT WORKED!!!

It is a fine, fine thing, to make an object – and one that works – and to learn new skills in the doing.

How to make a t-shirt quilt, part 1

Last year, a friend and I decided to put our heads together and make t-shirt quilts: quilts composed of leftover t-shirts we no longer wear but which still have some sentimental value. We both had only minimal prior quilting experience, and we figured tackling the project together would be easier than doing it alone (and more fun!).

We googled a lot of resources, tried a lot of things, and had to backtrack a couple of times. So I’m going to share here what I would do if I did it over again, not necessarily exactly what I actually did. :)

0. First, invest in some good tools:

  • Rotary cutter, plastic guide, and mat (as large as possible).
  • Sharp scissors.
  • Quilting square to make it fast and easy to cut consistently sized squares. Or, make your own with cardboard.
  • Sewing machine. You will also want a “walking foot” and probably a “free motion” or “darning foot” (if you want to do intricate detailed quilting).

t-shirt blocks1. Assemble your t-shirts. Wash them all. Iron them all (taking care not to melt the designs).

2. Stabilize the t-shirt material. T-shirt cotton is stretchy. Stretchy is not a good property for quilt blocks. Therefore, most guides have you attach interfacing (a thin, woven layer) to the t-shirt. Iron-on (fusible) interfacing is a good product to use. Cut it a bit larger than the size you want your t-shirt to be and iron it on BEFORE CUTTING the t-shirt. I cut my shirts out first and then had to cut the interfacing as well, and then it caused problems when it didn’t exactly match up. Interface, then cut.

3. Cut all your t-shirts into a standard size. Square, rectangle, whatever, but do make it standard. You will be thankful that you do not have to patch and adjust sizes later, like we did. We cut ours using rotary cutters and ruler/guide. This took forever and was prone to error in getting exact right angles on the squares. Instead, use a quilting square (hard plastic see-through square you simply cut around, shown at left from the While They Snooze blog) or make your own with cardboard (can’t see through it to center your design, but useful if you can’t find a quilting square in the right size for your project). If you feel extra crafty, make your own with cardboard as a *frame* around the square and you’ll be able to both see and cut.

4. Lay out your design. We used a simple grid of shirts. Decide how you like the overall color balancing to appear.

Here you can see my layout as well as the shirts I had to pad with strips of background fabric to obtain a consistent size.

t-shirt layout

5. Choose a background fabric for “sashing” between the shirt blocks and for the border. Cut strips of this fabric and sew it between the blocks to create rows (or columns) of quilt blocks.

We used 1/4″ seams based on googling, which is a very small allowance but reduces bulk in the quilt top. Here you can see three of my four rows seamed together.

4-strips-sml

Cutting many strips of consistent width, especially long ones (next step) is a pain unless you have industrial tools. If you only have a standard cutter and mat, you can carefully and precisely zig-zag fold your fabric to cut through many layers at once for a longer total strip. If you are not careful and precise, you will get a zig-zag strip instead of a long rectangle.

6. Cut longer strips to create the sashes between rows (or columns) and join them together with long seams.

5-grid-sml

7. I had a lot of shirts with interesting pocket designs that I wanted to include, so I decided to add a row to the top and bottom that included these pockets. I laid them out and did some math to get them evenly spaced and cut appropriately sized sashing to fill out the rows.

6-pockets-crop-sml

8. Add a border. You probably cannot cut a continuous piece of your background fabric this long, so just add a seam where needed. Or if you are a perfectionist, space the seams out regularly so it looks deliberate rather than desperate.

7-border-sml

You may like to miter the corners together to get a diagonal seam. This is not hard. Cut both border strips to extend all the way to the end of the corner (i.e., so they would overlap). Sew to the end of the interior blocks from both directions and stop. Fold the quilt so that you have a seam at 45 degrees from the two edges and sew from the interior corner out. Trim the excess fabric, unfold, and press the seams open.

8-miter-sml

Congratulations! You now have a quilt top. Next up is how to turn it into a quilt “sandwich” and then start into the actual quilting.

Craftivism and DIY politics

Elena Solomon wrote a paper titled “Homemade and Hell Raising Through Craft, Activism, and Do-It-Yourself Culture”. This paper, published in the Journal of PsychNology (that is not a typo), begins with the interesting claim that while crafters and DIY-ers tend to take pride in the self-sufficiency demonstrated by their crafts and projects, this stands in seeming contradiction to their common dependence on DIY gathering spaces (real or virtual). In most cases, we learn to craft from others (in person, from tutorials, from examples, from books, from videos…), and even after gaining skill, we seek to share the results with other people, or sell them to other people, or get feedback from other people… Witness etsy.com, ravelry.com, etc. Do It Yourself might in some cases be better phrased as Do It Yourself With Others.

Or at least that’s the argument I think the author wanted to make. While this was the teaser, and that’s what the article claimed to be focusing on, the paper then veers off into an analysis of “craftivism,” which I gather is when you use crafts to make political statements.

My first thought was, of course, of Madame Defarge.

Solomon first describes existing craft websites as “jarringly apolitical” (I am not sure what she expected to find), a phenomenon she attributes to “the DIY movement’s highly political ties with consumerism.” I think this is trying to say that craft sites are not political because they are created? controlled? motivated by? businesses selling craft supplies. It’s not quite clear.

The same sentence then asserts that

“the apolitical masquerade reveals, upon closer analysis, neoliberal ties to a more conservative capitalist agenda.”

I read that excerpt at least five times before admitting defeat. I have no idea what this is saying.

The paper then meanders into “retrograde postfeminism” and makes some actually plausible statements that a lot of crafting and DIY projects are marketed toward white, middle-class folk, who may participate without even seeing it as so. It guess that group of people would include me, but I don’t think I’d go as far as ascribing it to “the underlying political force that actively works to maintain a racialized and middle class market of consumerist individuals.”

Much more entertaining is the list of “craftivist” activities in this article. While Defarge doesn’t make an appearance, Chilean women who were imprisoned and oppressed do. These women sewed arpilleras to tell their stories and ask about missing loved ones, while living in fear of punishment.

Barb Hunt knitted a series of anti-personnel land mines to protest their use worldwide.

Kirsty Robertson designed a knitting pattern that encodes the Code Red Virus and made it freely available. Anyone can knit this computer virus (purl = 0, knit = 1) and transport it anywhere in the world… or encode their own favorite program into a new scarf. (Of course, the scarf-code is only meaningful if associated with an interpreter, compiler, or a computer that can run it.)

I can’t claim to have performed any acts of craftivism myself. What’s your favorite example?

Netflix origami: Lawrence of Arabia

The next Netflix movie I watched after MirrorMask was Lawrence of Arabia. Wow, what a movie! It leaves an enduring impression due to its sweeping desert vistas, its portrayal of the quirky, passionate, (slightly mad?) character of T. E. Lawrence, and its length. I learned a lot about WWI that I didn’t previously know, such as the role of the Arabs in the conflict.

And in honor of this great movie, I learned how to fold an origami camel. Check it out!

Netflix origami: MirrorMask

A friend challenged me to build on my initial foray into Netflix Origami by folding models related to the movie I had just watched. The next movie turned out to be MirrorMask. I found the movie to be a visually delightful fantasy, with elements reminiscent of Labyrinth, Alice in Wonderland, and the Neverending Story. The Jim Henson company was a major part of the movie-making effort, and much of the puppetry speaks to that, albeit with a darker, Neil-Gaiman-inspired flavor. The plot isn’t terribly complex, but I loved the experience of watching the movie.

But enough about the movie — what about the origami? I found instructions for making a Guy Fawkes Mask that seemed like it would fit the bill.

The instructions are extremely sparse and rely on cryptic hand-drawn diagrams as well as assuming that you have a good familiarity with terms like “squash fold” and “crimp fold”. I’m not sure I would have made it through without relying on the eminently more useful video 1 and video 2. But combined together I was able to produce, well, something that almost looks like a mask!

This is a neat little model, and with more practice I think I could improve my execution as well. :)

Older entries »