August 30th, 2007 at 9:58 pm (Education, Spacecraft, Technology)
Today was the first day of my Remote Sensing class, which I am attending remotely through USC’s Distance Education Network. In this 2.5-hour class, we covered an introduction to what remote sensing is, what kinds of instruments are used, and some highlights in terms of scientific discoveries that have been obtained through this technology. Here are some tidbits I took away that were surprises:
- Some of the earliest “remote sensing” involved sending cameras up with balloons, then retrieving them and developing their film. This kind of surveillance was used as far back as the Civil War!
- The (spectral) width of atmospheric absorption bands varies with atmospheric pressure, and therefore with altitude; as pressure increases, they spread out to cover adjacent wavelengths.
- Sea-surface height varies with water temperature (this is how they track El Nino) and with water depth (useful for mapping the ocean floor from orbital observations of the sea surface). Separating the two effects (lower sea-surface can mean colder water and/or an oceanic trough) would seem to be a significant challenge.
- Landsat-7, unlike its predecessors, can detect clouds in images on-board and decide to discard cloudy images.
3 Comments
2 of 2 people learned something from this entry.
August 22nd, 2007 at 9:03 pm (Computers, Technology, Web)
Now that I have my linux machine, astra, up and running again, one of the next things is to set it up to serve access to my printer, nova, over my local wireless network. (Nova is just as old as astra, and can only be accessed via parallel port, which my Mac laptop lacks.) But when I tried a test-print from astra, just using the regular parallel cable connection, to my dismay I discovered that nova had degraded due to neglect and age: it wouldn’t feed paper correctly. I couldn’t print. Argh!
After some googling, I determined that it would cost on the order of $50 + parts to have someone fix the printer. Not *bad*, but at that price it’s time to start thinking about just buying a new printer. But I’m stubborn, and I kept googling. And what do you know — I found fixyourownprinter.com (in contrast to fixyourprinter.com, which redirects to xerox.com).
Apparently, my particular problem (bad feeding for an HP 1100 LaserJet) is one of their most common items (It turns out your printer here is only *mostly* dead!), and they sell a kit to solve it. Could it be? $19.95 + shipping, and I could not only save money, but achieve the moral victory of having fixed my own printer? The testimonials raved about success after success with this kit, many emphasizing how useful the accompanying video was.
So I went ahead and ordered one. I got it the next day (priority mail) and eagerly ripped open the envelope to find… four sheets of paper. A receipt, an ad for other kits, a half-sheet of instructions, and one page containing 3 photographs of some steps in the process, with a replacement “separation pad” stapled to the sheet. No video. Had I been duped?
With little expectation of success, I followed the instructions and replaced this little pad that the printer uses to pick up sheets. And ten minutes later, I kid you not, I sent a print job to nova… and it worked! As good as new! It’s practically magical!
So my apologies to fixyourownprinter.com for doubting them. Their kit worked like a charm and I did, in fact, manage to fix my very own printer. Whee!
NB: I googled the separation pad and found that you can order it for $4 + shipping online. Now that I know how to replace it, that’s what I’d do in the future. But hey, $10-15 extra for the experience of learning a new repair skill? So worth it.
3 Comments
3 of 3 people learned something from this entry.
August 19th, 2007 at 11:07 am (Crafts)
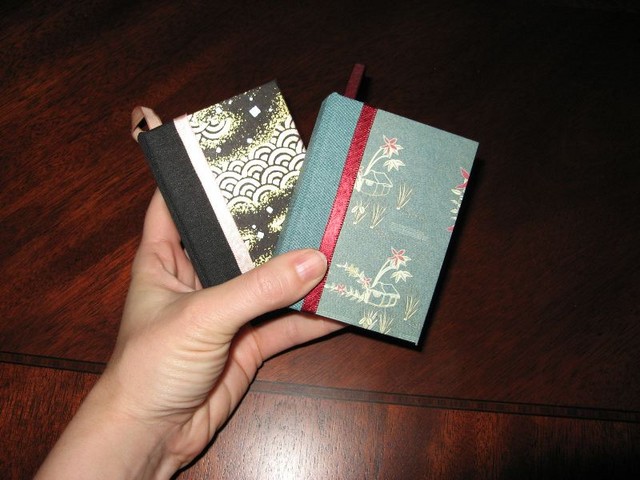
 I attended a Bookbinding class at Vroman’s, a local bookstore. In this four-hour course, we learned how to construct a simple binding and created two small examples (see right). The instructor provided us with paper “folios” (folded sheets in sets of six) and all of the other materials. We did the rest.
I took detailed notes on the process, but without step-by-step pictures it would be a very long entry indeed to convey all of the instructions. Instead, I’ll focus on the interesting tidbits I took away with me.
- The type of book we made is called a “codex”, which consists of multiple “signatures” (folios sewn through their folds into little six-sheet booklets). In our case, the signatures are sewn individually; I think traditionally they would all be connected with a single length of thread, which would increase the book’s cohesive strength. Our individually sewn signatures are connected by merit of some strong liquid glue and fabric-paper along the spine. In theory, a signature could fall (or be pulled) out due to this construction.
- Making the book casing was one of the most enjoyable parts of the process, since you get to pick a pretty colored paper to wrap around the boards for the cover. You fold the paper around the cardstock, mitring the corners, and then glue “end papers” (cardstock) on the inside edges to give it a finished look.

- The little colored strip at the top and bottom of the book’s binding (click image at right to enlarge) is just a bit of decorative tape, at least for the books we made. It doesn’t actually do anything for the binding.
- We finished by “embellishing” the books with ribbon trimming and (in my case) a ribbon bookmark that’s glued into the cover. Nothing like a built-in bookmark!
1 Comments
1 of 1 people learned something from this entry.
August 13th, 2007 at 9:22 pm (Computers, Productivity, Technology)
Courtesy LifeHacker, I came across this great Adobe Reader tip to reduce the lethargy with which it starts up:
To remove this ‘feature’, simply navigate to your %Program Files%\Adobe\Reader 8.0\reader\plug_ins folder, and rename (delete, copy elsewhere) the ‘accessability.api’ file.
Translated into Mac-friendly coordinates, we have:
To remove this ‘feature’, simply navigate to /Applications/Adobe Reader/Adobe Reader 7.0.8.app/Contents/Plug-ins, and rename (delete, copy elsewhere) the Accessibility.acroplugin/ directory.
What this “fixes” is Reader’s need to index the whole document so that it can, among other things, read it out loud to you. No thanks, Adobe!
I can confirm that Reader now loads in half the time it was taking before. Preview is still my PDF reader of choice, since it’s so lightweight and lightning-fast, but now it’s at least worth keeping Reader around “just in case.”
The same source notes that Adobe may have improved the program on its own for version 8.1, so this hack may not be necessary in the future.
4 Comments
1 of 2 people learned something from this entry.
August 13th, 2007 at 8:32 pm (Computers, Technology)
My recent installation of Ubuntu went quite smoothly, with the notable exception of my Linksys WMP54G wireless card. Despite the Ubuntu wiki’s encouragingly optimistic assessment of this card as “works out of the box”, this was not my experience. However, in case others encounter this challenge, I can highly recommend the RT61 HOWTO guide for Ubuntu, which almost did the trick. My Linksys card uses an RaLink RT61 chipset. Now, the rt61 kernel module does come with Ubuntu 6.0.6, and it was detected and loaded, but that wasn’t enough for my wireless card to make contact with my wireless router. So here’s what I learned:
- Either the rt61 kernel module shipped with Ubuntu 6.0.6 is defective (say some) or it simply needs additional configuration (say others). The instructions at the above-noted HOWTO walk you carefully through the process of obtaining the RT61 driver source (but note that the link to that source is broken; try http://www.ralinktech.com.tw/data/IS_Linux_STA_6x_D_1.1.1.0.tar.gz instead) and building your own rt61 kernel module. This did result in a different .ko file, which I dutifully loaded, but this alone wasn’t enough, either.
- The key step seems to be configuring your card to recognize the router, which isn’t that surprising (what is it supposed to be, a mind reader?). However, I don’t see how you would do it without downloading the driver source package, which comes with the critical rt61sta.dat file you then edit to suit your network setup. As to how exactly to specify that configuration, the HOWTO merely instructs: “Enter the necessary information to access your network. Refer to the readme file for options.”
- The README claims that you can configure your card with the built-in iwconfig and/or iwpriv commands. This didn’t work at all for me. For example, iwlist ra0 scan will return a list of networks your card can “see” — and mine saw two: my own network and my neighbor’s network. But I couldn’t iwconfig or iwpriv it into joining my network no matter what I did; it just silently ignored my commands.
- Should you instead go the config file route, the README instructs: “set NetworkType to ‘Adhoc’ for using Adhoc-mode, otherwise using Infrastructure” (the README’s native language is seemingly not English). Both of these turned out to be wrong. I finally clued in (by looking at what iwlist was telling me) that my network type is “Managed”. After stripping out the other weird defaults in the config file (like a SSID of “AP350” and a WPA key of “abcdefghijklmnopqrstuvwxyz”), I was finally able to get things up and running.
So, ultimately, if Ubuntu really does want them to work “out of the box”, then it would be nice to see a graphical config interface for wireless cards, in which you could specify these things without needing to know how to load, unload, and build kernel modules. However, kudos to the HOWTO overall, which even includes instructions for how to make a startup script so that your system will use dhclient to snag an IP address automatically when you boot.
By the way, I can confirm the unsettling behavior others have observed, which is that if you use the graphical “Networking” tool to configure your wireless card (at least this kind of wireless card), you will then reboot into oblivion. Don’t do it. :) (But if you do do it, then reboot into recovery mode, edit /etc/network/interfaces to comment out all lines that reference ra0, and you should be able to reboot normally.)
P.S. Yes, this was posted from astra, using the wireless card herein described. :)
4 Comments
2 of 2 people learned something from this entry.