Desoldering a bad triac
February 4th, 2011 at 9:40 pm (Electronics)
Some time ago, I wrote about the demise of my touch-lamp. After the bulb burnt out, the lamp no longer responded to touch. A bit of research online suggested that the triac had likely been destroyed by the bulb’s dying throes. It looked like this could be solved by replacing that part, but I wasn’t quite up to tackling it on my own.
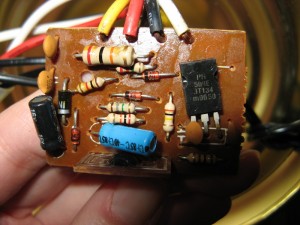
Times have changed! I read through some excellent repair instructions (thanks to a helpful commenter on my original post) which noted that most such lamps are equipped with a BT134 or BT136 triac, which can only handle up to 4 amps of current. Simply replacing this component with a BT139 triac should solve the problem forever — BT139s can handle up to 16 amps. Thus encouraged, I pulled the base off my lamp and found, to my delight, that the author of those instructions was spot-on: my lamp had a BT134! Here’s the whole circuit board, with the three-pronged triac on the right:

The letters on the triac say “PH 500E BT134 m9650”. I’ve located the equivalent BT139 part which costs all of $1.19. (What’s sad is that the BT134 costs $0.87, so for just 32 cents more, the manufacturer could have saved me this hassle. But most manufacturers probably don’t want to spend 32 cents more to build the lamp even if I am willing to pay 32 cents (or even a dollar!) for a higher-reliability product, since they’re doing mass production and mass advertising and trying to beat their competitors’ prices, etc.)
The next step is to remove the old part and replace it with the new one. My boyfriend Evan seized on this opportunity to teach me how to solder. He demonstrated soldering two wires together, and I eagerly observed and then got to try it myself. Unlike stained-glass soldering (my only previous such experience), you don’t use flux to prep the surfaces you’re joining, but instead the solder has a “rosin” core that performs the same function. The solder container had a warning on it that included “do not breathe the solder fumes, and wash hands before eating or smoking”, which cracked me up. You heat the soldering iron above 370 F (the melting point of solder), wipe the tip of the iron on a sponge to clean it, then “tin” the tip with a dab of solder. You use the iron to heat the wires to be soldered, so that they are hot enough to melt the solder as well (rather than touching the iron to the solder directly, which would be harder to direct where you want it). On touching the tip of the (solid) solder to the hot wires, it melts and flows into crevices and gaps to seal the wires together.
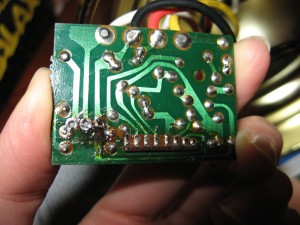
After joining the two wires, Evan showed me how to desolder, both with a copper wick (an absorbent braided fabric that sucks up liquid solder) and with an aspirator (that suctions the liquid solder away). Encouraged by this example, I desoldered the bad triac out of the circuit board. Here’s the result (this is the back side of the board shown above; the desoldering took place on the left side near the scorch mark):

Now I just need to wait for the new triac to arrive, then borrow a soldering iron and stick it back in. (Or maybe I’ll have my own soldering iron by then!) And then, victory over the broken lamp will be mine!
Update (Feb. 13, 2011): I have successfully fixed the lamp!