How to take apart an engine

Today I got to take apart an engine… and put it back together.

I attended a training class in small engines. Our idea is that this could be a great workshop for Kids Building Things. Getting to take apart an engine in middle school? Wouldn’t that have been awesome?

As it turns out, this class was also an unexpected refresher in basic engine knowledge that relates to my pilot training! We discussed 4-stroke combustion engines, why water in the fuel is bad, and what pre-ignition and detonation are. The plane I fly has a 4-cylinder air-cooled engine. The one we got to take apart in this class was a single cylinder, also air-cooled. I think it is the type of engine you’d use in a lawn mower.
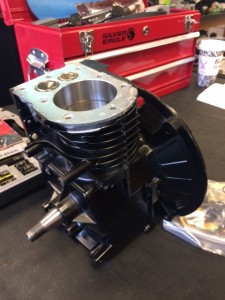
EngineHere is the engine before we started disassembling it. The piston is in the big shiny hole at the top. The fuel/air mixture and exhaust valves are the smaller circles on the top. The shaft sticking out goes to the magneto/flywheel system (not shown) and the other end of that axis is the drive shaft (to actually do the work you want to achieve with the engine). The black radial looking part is the oil pan. In normal operation, that should be at the bottom, so this is a vertical mount engine, and it could (for example) spin a lawn mower blade).
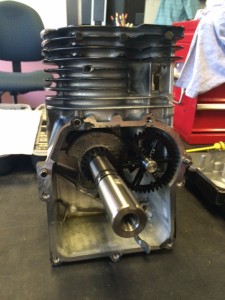
UncoveredWe worked in pairs on our engines. After removing the oil pan, you can see the drive shaft (long cylinder pointing out) and the cam shaft (small plastic gear on the right). The cam shaft gives the valves their timing so they open and close at the proper points in the 4-stroke cycle.

Our instructor drilled us through the intake-combustion-power-exhaust process, which was nicely illustrated when you hand-turned the drive shaft and could see the piston go up and down and the valves open and close in synchrony.
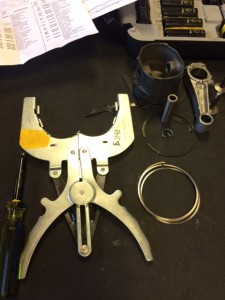
Ring spreaderThen he had us extract the piston from its cylinder. It has three sets of pressure rings that help give it a good fit in the cylinder and also (apparently) wipe oil down from the cylinder walls. There is a really awesome tool called a “ring spreader” that allows you to easily remove and replace these thin metal rings. At right you can see the tool with some rings next to it. The dull grey slightly oval shape sitting above the rings is the piston head, with its disconnected shaft to its right. The piston itself is round, but underneath they apparently tweaked the shape to use less material (reduce weight) which is why it isn’t quite round.

We then removed the valve assemblies, including the springs. By then we were left with a metal block that did nothing. We then put all of the pieces back together. Re-installing the valve springs was definitely the trickiest and fiddliest part – my partner and I took several attempts before we got it (success!).

In a longer class, apparently you get to put your engine on a mount and fire it up! Seeing it run after you’ve taken it apart and put it back together must be really satisfying. But even without that, I can now see how you would go about getting in there and replacing a worn part. It’s not such a mystery. And now I understand a bit more about what probably happened when my ’86 Nissan Sentra’s timing belt broke. No wonder it was a major repair!
How to make paneer

I recently attended an Indian cooking class with a friend, and a couple of weeks later, we decided to put our new skills to the test. One of the things we needed was paneer. Paneer is that awesome cheese that comes embedded in saag paneer and other tasty Indian dishes. Instead of buying it, I decided to find out how to make my own. Turns out that it’s quite easy!

I used this paneer recipe. Believe it or not, paneer is just curdled milk! All you do is heat up whole milk, add an acid (I used lemon juice), and then once the milk curdles, you pour it through cheesecloth to strain out the whey and retain the curds. Here’s what it looks like:

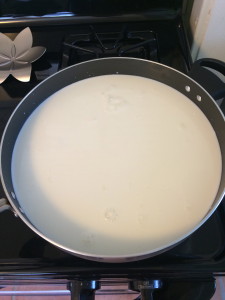
MilkHeat up half a gallon (8 cups) of milk. This will yield about 1 cup of paneer.

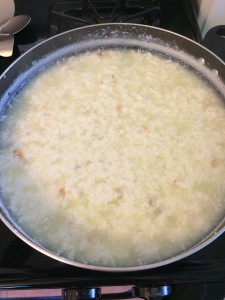
CurdleMilk curdles!

The little brown bits are from the milk cooking on the bottom of the pan. The recipe says “stirring frequently” but really they mean “stirring constantly” to avoid this. I ended up fishing out as many little brown bits as possible, but it’s probably fine to leave them in (just visually a bit strange). Another method I later heard was to not stir at all and let the brown skin form at the bottom, then just leave it behind when you pour the mixture out.

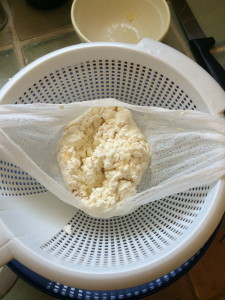
DrainI didn’t actually pour the mixture out because the cheesecloth didn’t really cover my whole colander. Instead I skimmed the curds out and plopped them onto the cheesecloth, which worked just as well. I poured the remaining whey down the drain. Later I learned that you can save the whey to use when making bread for a little extra flavor.

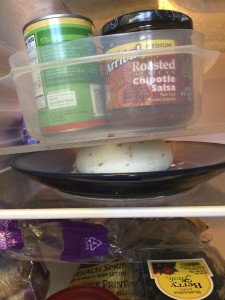
SquishI twisted the cheesecloth around the curds and squeezed moisture out, then let it drip for a while, then put it on a plate, in the fridge, weighed down by other objects, to squeeze out more liquid. It worked famously!

I unwrapped the paneer and sliced it into cubes for the saag paneer.

DinnerHere is the final meal: tofu curry, basmati rice, samosa, saag paneer, raita, and homemade naan, plus cilantro monster sauce and mint “cocktail” (non-alcoholic) – the mango lassi came later. Phenomenal!

Flying to Agua Dulce

On the 4th of July, Manuel suggested flying out to Agua Dulce, a little airport nestled in the San Gabriel Mountains (elevation 2660′ MSL). I’d flown over it a few times in transit to other places, but this was my first chance to land there.

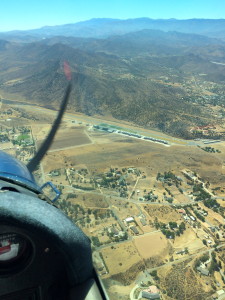
Agua DulceManuel flew out, with me handling comm. We got flight following at 6500′, which meant cresting just over the mountains and then descending. As we got close, SoCal suddenly told us that “runways 22 and 4 are closed at Agua Dulce” which are, of course, its only runways. Manuel decided to overfly it anyway. We got right over it and SoCal said that the closure actually would start the next day, so we were able to land. Unicom was deserted, but we could see the windsocks and runway 22 seemed appropriate, so Manuel did a teardrop and came in to land on 22. At right is the view you have entering on the 45 for 22.

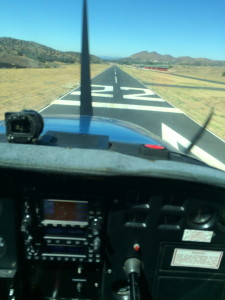
Agua Dulce runway 22It’s a bit of a hairy approach. There is rising terrain to the northeast as you prepare for your base turn, so you’re flying right at the hills while judging your altitude and distance from the runway (although it isn’t nearly as bad as Flabob). Coming in steep is a help, and a smooth 180-turn descent is probably more appropriate than a regular rectangular pattern. Then you’re on final and whoa, this runway is NARROW! As you can see, the numbers barely fit! There is also a significant downhill grade which feels very odd when you take off.

Plane at Agua DulceThe airport and runway are very nicely maintained, aside from the lack of taxiway markings from the runway (they can zip past before you notice them if you aren’t prepared!). The hangars are a beautiful deep red color. I found out later that it was to be closed for filming, and I can see why. While we were there, another plane fueled up and then took off. It was very shiny (aluminum?). You can also see a beautifully vivid windsock (one of three) and a wind tee on the ground (that’s the segmented circle).

We swapped seats and I did a loop around the pattern for practice. I went much too wide trying to avoid the hills to the northwest; a tighter pattern would allow you to come in before the hills and be immediately on (tight) downwind for 22. I landed, got off, and then taxied back, and took off to depart to the southwest (honoring their noise abatement request for 10-deg right turn after takeoff – although that heads you to the hills so it feels awkward). I flew back at 5500′, going around the mountains so a bit less direct than Manuel’s trip out. Manuel handled comm for me. It’s nice to team-fly; it allows you to focus more on flying the plane!

This plane just got some new avionics (ADS-B transponder) which among other things gives you traffic information on the GPS screen. On the way back to El Monte, I was just about to begin my descent when I noticed a plane seemingly heading straight towards us but 700′ below. The EMT tower announced the traffic to us, and we scanned for it but couldn’t find it. (Air quality is still poor from the recent fires, and there’s a lot of haze.) I delayed my descent to stay well above it. Then we got an audible warning from the avionics about this traffic! That was kind of cool. We finally spotted it ahead and off to the left, below us, and then I was able to descend.

Since we were a bit high on final, I got down to idle (still high) and went into a slip. Just a few seconds later we were on the glideslope so I came back out of the slip and proceeded with a short-field landing (full flaps). Yes, the flaps would have been enough to get me down as well, but it was a good chance to practice slips (it’s been a while!).

I’m up to 12 L.A. area airports now. Many more to go!

Be a citizen scientist for nature

I recently discovered iNaturalist, which is a website and smartphone app that encourages you to collect observations of plants, animals, and insects. By recording when and where they were observed, you contribute to the store of data about these organisms. This place must be every biologist’s dream come true! Data for free!

They’ve put some thought into how to ensure high quality data. When you log an observation of, say, a ladybug, you can simply record it as “insect” and let others refine it, or be as specific as you feel confident to narrow down its precise species. The crowd of other users will review your tag and vote for it as correct or make corrections. When an organism is pinned down at the species level, that observation becomes “research grade.”

So far I have contributed observations of a praying mantis (needs review) and a raccoon (research grade!). When you log an observation and connect it with a species, you also get to see a map of where else that species has been seen.

You can also “subscribe” to get updates whenever a particular organism of interest is spotted! I signed up for praying mantises (mantis religiosa), spiny lizards (at the genus level (sceloporus), not a species), and collared lizards (family crotaphytidae – a beautiful creature from my childhood). Just today I’ve seen a bunch of new lizard observations (one dead). I’m looking forward to more. (I’m also being exposed to the Latin names for things. What fun!)

Another cool feature is that you can browse an area (say, where you are currently standing) to see what has been observed there.` You can also join specific research “projects” and contribute your matching observations (e.g., a project might specify that they want only pictures of reptiles observed in southern California).

I love to see well constructed efforts to engage people in the process of science. This one seems particularly compelling and enjoyable to use.