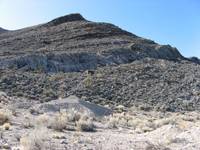
Our Geology 601 field trip this spring took us into the wilds of Nevada. The class, called “Crises in Earth History”, examines past mass extinctions and the evidence for such in the rock record. Nevada contains some great field sites associated with these events. Our first day focused on the Permian-Triassic boundary. While the P-T boundary itself is not visible in the southwestern U.S. (due to a lack of deposition at the time or a later erosional event), we were able to visit the late Permian in Arrow Canyon and the early Triassic in the Muddy Mountains.
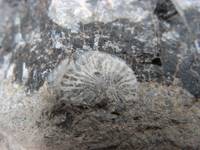
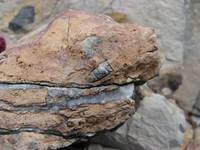 This was a fantastic experience! I’ve never gone fossil hunting before, so I didn’t know what to expect. I also haven’t taken any paleobiology classes, so I didn’t have the expertise needed to identify the fossils myself. But luckily, I was out there with several other grad students and professors with exactly that knowledge. We saw the broken-up arms of crinoids (at right), radial corals (below left), and even fossilized tree roots (below right).
 We hiked further into the canyon, which flourished with present-day life as well (notably, lots of gorgeous barrel cacti). I found an interesting specimen that turned out to be (in the best guess of the assembled professoriate) bladed gypsum crystals. As usual, the line between biotic and abiotic isn’t always obvious. However, even this abiotic find excited interest in the group because of the implications for the local environment (gypsum tends to form in shallow marine waters).
 We had lunch in a fabulous slot canyon that felt like it came right out of a Tolkien book, with towering rock walls only 20 feet apart, a fringe of bright green grass along the base of both sides, and the canyon itself leading off into mysterious twists that practically demanded further investigation. However, time was limited and we headed off to our next stop.
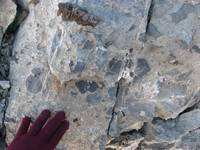
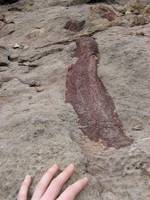
 At the Muddy Mountains, we got to observe the early Triassic. A recent flash flood had wiped out part of the road and cut into the surrounding hills to provide us with a remarkable glimpse into newly exposed beds. We found an incredible shell bed, where the fossils (bivalves) were literally just falling out of the rock (see image at right, lower layer).
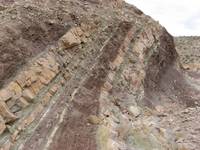 Across the road, early Triassic “red beds” (shale) were in evidence, alternating with carbonates (pale layers). This has been taken as evidence of fluctuating (local) sea levels, as red-beds are generally believed to have formed above water and carbonates below it. However, if you look closer, you can also see thin green shale layers between the carbonate and the red beds — on both sides of the carbonate, in fact. The green color, instead of red, could indicate that it was formed in anoxic (low or no oxygen) conditions, but this is unlikely to happen above water, and even in the water usually would only happen in very deep water, while the carbonates form in shallow water. We were all standing around scratching our heads, and someone suggested that the green shale could be an alteration of the red shale, caused by contact with the carbonate. This looks plausible visually: I noted that the green layers were thicker where the carbonate layers were thicker, as if the thicker carbonate could affect more of its surroundings. On the other hand, no one could come up with a chemical reaction that the carbonate would induce on the shale to reverse its oxidation.
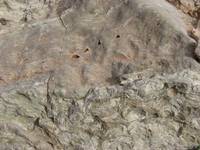
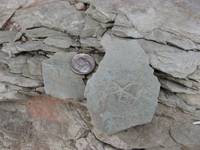 We moved further up the road, and turned the corner to find the real jackpot. Trace fossils are fossil structures that record not the body of a organism but marks it made while burrowing or crawling or otherwise disturbing soft sediment. We were told that this particular outcrop had, somewhere in it, the trace fossil asteriacites, a star-shaped imprint where a starfish-like creature rested. Immediately, we all tackled the outcrop with enthusiasm, sorting through bits of rock to find these centimeter-scale fossils. The sedate meandering observational pace transformed into an Easter-egg hunt or garage-scale atmosphere, and just minutes later the first find was declared. At left is one I went home with. Whee!
 Descending back to the road, I almost stepped on a bit of present-day life. I hesitated mid-step when the ground below me seemed to shimmer, then realized that it was occupied by a baby rattlesnake (about one foot long). It was the first rattlesnake I’d ever seen, and I was eagerly zooming in for pictures, when another student suggested that I back away because, after all, they are venomous, and apparently (she said) the baby ones are actually more dangerous than adults because they have no control over how much poison they inject, so they just shoot you full of everything they’ve got. I backed away regretfully (I was fascinated by the evidence of its last meal) but did get a few photos!
Overall, the extinction associated with this boundary is believed to have been the biggest in Earth’s history, with up to 96% of marine species going extinct. And indeed, we observed that Arrow Canyon’s fossils showed much more diversity than those in the Muddy Mountains (although I was surprised to see so many Triassic fossils — this section must have been a good bit after the actual boundary). An excellent start to the field trip!
 On the final day of our field trip, we headed to New York Canyon, one of the best places to see the Triassic-Jurassic boundary. We hiked up a twisting path to the top of a ridge, and then one by one began to spot fossils. On the ground. Just lying around in bits and pieces. Everywhere! These were a combination of bivalves, gastropods, and ammonites — lots of ammonites. Ammonites are commonly used for biostratigraphy, the practice of dating a particular layer by the type of ammonites it holds. They’re particularly useful for this because they were evolving so quickly that a particular shape (type of chambers, amount of ridges on the outer shell, etc.) can pinpoint dates more precisely than most other fossils can.
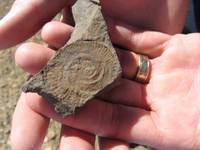 Most of the fossils were trace fossils, or imprints of an ancient organism (as shown at left). However, we did find some whole pieces that were undoubtedly the silicified remnants of actual ammonites. I found one about 1 cm in diameter. It would not be an exaggeration to say that the whole ridge we were on was littered with these things — so much so that we were making slower and slower progress up to the top and then down the other side. Our guides were urging us on to the next ridge over, so that we could look back at the actual boundary layer from enough distance to really see it, but it was awfully hard to press onward when everyone was oohing and ahhing over their latest finds.
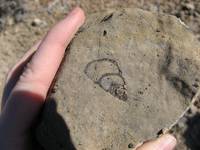 At right is a beautiful slice through a gastropod fossil (also silicified). I was struck by how almost unrealistically perfect it seemed — as if it had been drawn, not real! The sparkle effect induced by the silicification makes it even more of a Hollywood fossil.