How to read a french fry

“Not only good science but also good fun,” states the New York Times blurb for this excellent book by Russ Parsons. I agree, adding, “and good eats, too!” Like What Einstein Told His Cook, this book (How to Read a French Fry and Other Stories of Intriguing Kitchen Science) goes behind the kitchen scene to explain the whys and hows of cooking, treating it as the exercise in chemistry that it truly is. The book also contains a heaping serving of absolutely delectable recipes that I am eagerly working my way through.

Here are some excellent bits of information I gleaned:

  • Ever wondered why cast-iron skillets should be “seasoned” when new, by repeatedly heating a bit of oil in the pan? The goal is to build up a waterproof, nonstick surface by taking advantage of a natural reaction between the oil any any bit of water: the oil hydrolyzes, and some of the byproducts are polymers, which stick to the pan plastic-like. This explains why you don’t need to do it with nonstick pans.
  • “Chicken-fried” steak always seemed a bit of an odd term to me. It turns out that “chicken-fried” just means “pan-fried”, a technique in which meat (usually chicken) is fried in shallow oil so that only the bottom part is deep-fried and the top gets a kind of moist roasting.
  • Cooking isn’t just about heat. If you add a few tablespoons of water when sauteing vegetables, they should cook “more thoroughly”, because water dissolves the pectins and cellulose in the veggies and softens the cell walls. Sugar also “cooks” fruit by sucking out moisture and collapsing cell walls. (This is helpful when making ice cream with fruit, as it prevents the fruit pieces from turning into isolated ice cubes.)
  • Pears have a grainy texture because they contain little crystals of lignin, the woody substance generally appearing in planet cell walls.
  • We let pancake batter sit for 10 minutes after mixing so that any gluten strands that developed (caused by mixing) can relax, and the resulting pancakes will be lighter and fluffier. (I always wondered why!)

I’m only 1/3 of the way through this book. I look forward to many more insights in the rest of it!

Leftover Ricotta? Make Gnocchi!

I had some extra ricotta cheese, left over from making lasagna, and I wondered: what else can you make from ricotta? Some googling turned up several answers, including Ricotta Gnocchi with Browned Butter and Sage, and I decided to try it out.

I’ve never made gnocchi, but I love eating it. I had some vague idea that it was generally made with potatoes. But this recipe creates mostly-ricotta gnocchi (with some parmesan cheese, parsley, and flour). The resulting dough was extremely sticky, even after adding some extra flour. But I rolled it out, cut it into little pillows, and then pressed them into a fork as directed. The next instruction was to drop them in boiling water and then spoon them out when they floated to the top, in 2-3 minutes. They were so squishy when I dunked them that I was skeptical that 2-3 minutes could really turn them into gnocchi, but sure enough, it worked! Very easy!

The browned butter with sage was absolutely divine. I was fascinated to observe that the butter really did turn from clear-ish yellow to a browned hue, simply by heating. Apparently this is caused by the milk solids and salt in the butter turning brown. Except that — ha! What I’d actually used was I Can’t Believe It’s Not Butter (I’m sure several of my friends are now cringing in horror). I don’t think it has any milk solids, but apparently, it browns too! And it’s tasty!

(Now I’m itching to look up the Fats chapter in my copy of “What Einstein Told His Cook”—I’m pretty sure this was covered—but I loaned it to a friend a while back.)

If you have any other great suggestions for ricotta cheese recipes, I’d love to hear them.

How to bake bread

The idea of baking bread carries with a sense of arduous labor: lots of stirring, lots of kneading, lots of work. I’ve been curious about it for a while, but who has the time for all that work when you can get a loaf of bread at the store for $2.19?

The other day, I came across a blog entry (by “The Simple Dollar”) titled Homemade bread: cheap, delicious, healthy, and easier than you think. Well, I could hardly pass up a challenge like that! Just how easy is it to make bread, I wondered?

It turns out: not hard at all. It’s not even that much work. The only trick having about three hours when you’ll be at home and can wait out the rise phases. The actual work you do is minimal, between the waiting bits.

The post I linked to above has a nice extended set of instructions (with photos) for how to make bread following a simple recipe. For brevity, I’d like to excerpt (and paraphrase) the actual recipe here:

  • 1/4 cup milk
  • 5 teaspoons sugar (or 1 1/2 tablespoons)
  • 1 teaspoons salt
  • 5 teaspoons butter (or 1 1/2 tablespoons)
  • 1 package active dry yeast (you can get yeast near the flour at your local grocery store)
  • 2 1/2 to 3 1/2 cups flour (get unbleached white for your first attempt)
  • Corn starch or nonstick cooking spray (to prevent the bread from sticking to the bowl or pan)
  1. Warm up the bowl and mix the yeast with warm water.
  2. Melt butter in the microwave and add butter, milk, sugar, and salt to the yeast. Stir.
  3. Add 2 cups flour and stir until it is absorbed.
  4. Continue adding 1/4 cup of flour every minute (while stirring) until the dough just barely sticks to your finger.
  5. Drop dough onto floured surface and knead for 10 minutes.
  6. Form dough into a ball, put in a clean bowl, cover with a towel, and let it rise in a warm place for 1 hour.
  7. Punch the dough a few times to cause it to shrink back down a little. Spread dough out into a flat rectangle, as wide as your bread pan is long and 1.5 times as long as it is. Roll it up and stick it in the pan, seam side down. Cover with a towel and let it rise for another hour.
  8. Bake it in the oven at 400 F for 30 minutes. Done!

Challenges:

  • My yeast packet didn’t indicate how to mix it up; it only had instructions for how to put it into a bread machine, not how to make it yourself (which I found amusing). Those instructions said to use 1/4 cup water. The post I mention above says to use “something along the lines of” one cup of water. So I used one cup of water. It seems like this might actually matter, but maybe extra water just calls for a bit of extra flour, so it evens out.
  • It was a rather chilly day here in southern California (mid-60’s) so there wasn’t a “warm” place for the dough to rise in my house, and I didn’t feel like wasting oven heat for two hours. So it may not have risen as much as it could have.
  • I only had bleached flour, not unbleached flour. ;)
  • I had neither cornstarch nor nonstick spray. I did have a nonstick bread pan, though.
  • I decided to experiment with spreading some butter on top of half of the loaf before baking it. This gave one side a “stretched” look from where my knife disturbed the yeast factory. Tastes fine, though.

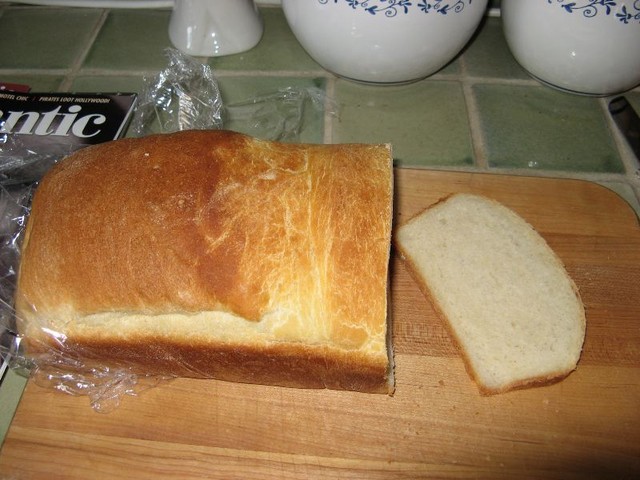
Despite these formidable obstacles, what came out in the end was… a fantastic loaf of white bread!

The Simple Dollar’s end result My loaf of bread

The final instruction from The Simple Dollar is to “Let it cool down completely before slicing.” He’s kidding , right? Like you’d ever invest all of that effort, wait three hours, and not want to savor some fresh-baked, hot bread? Pshaw. Sure, it’s easier to slice when cooled, but it’s oh-so-tasty when it’s hot. :)

There’s something very satisfying about eating bread I baked. Maybe it’s that bread is such a symbol of adult independence (being the “bread-winner”) or just the feeling of being able to take “raw” materials and turn them into something refined and edible. Thumbs-up.

Risotto revelations

Risotto is such a delicious, savory treat; it’s one of my favorite things to order at Italian restaurants. I’d gotten the impression, though, that it was somehow hard to make at home (and apparently I’m not alone). I was pleasantly surprised to discover that, in fact, risotto is very easy to make. The only downside is that you’ve got to stand at the stove for ~25 minutes, stirring and stirring, as you coax the rice grains into absorbing surprising amounts of your favorite broth. But regular rice takes about as long to cook (albeit without continual tending), and really, stirring is pretty low on the technical cooking skill difficulty scale.

At any rate, while cooking some risotto tonight (for the second time ever, and the first time without an explicit recipe), I found myself wondering at some of the common Risotto Rules. Why is it that you are instructed to add “one cup of broth at a time” (in some cases, “one-half cup of broth at a time”), rather than just throwing all of the broth in at once? And why is it important to saute the rice in oil before adding the broth? Technique aside, how and why does my arborio rice do that super-absorbent trick to turn into risotto?

I pulled my trusty copy of “What Einstein Told His Cook 2” off the shelf and found the following excerpt:

In recent years, several specialty rices have become popular in the United States. One is the traditional Italian arborio rice, a particularly absorptive medium-grain variety. It is rich in amylopectin starch, the branched, bushy molecules of which trap and absorb water quite readily. Arborio rice will easily absorb three times its own volume of stock or broth, making it ideal for risotto.

Most recipes I’ve seen actually have you supply the rice with 4-5 times its volume of broth, which is pretty impressive.

I found even more explanatory details from an HGTV article on risotto, including:

Sauteing rice in butter or oil creates a shell around each grain, allowing the grain to slowly absorb moisture. This will result in creamy risotto, where each grain maintains its own shape.

And how does the rice produce “its own sauce”, as advertised on my package of arborio rice? It’s the high starch content, which when brushed off the rice grains (during stirring) and mixed with broth creates a thick, creamy sauce.

As for the “one cup at a time” instruction, I pondered it while stirring and stirring and finally decided that the only possible difference it could make is in terms of the evaporation rate of the broth. Less un-absorbed broth at once means less lost to evaporation. If google is any guide, the consensus is with me on this one. (However, I did break the rule about having the broth heated before adding it to the mix. Too much work. I just added less at a time, and the resulting risotto seems not to have suffered a bit.)

How to make a potato frittata

Tonight I wanted to try a new recipe, but I didn’t have a whole lot of raw materials on hand. I scrounged around and found this recipe:

Potato Frittata (serves about two people)

  1. Peel two potatoes and slice thinly. Boil 8-10 minutes in salted water.
  2. Meanwhile, preheat oven to 375 F.
  3. Also meanwhile, cut up some veggies and saute them in olive oil. The recipe suggested an onion, but all I had was a bell pepper, which turned out just fine.
  4. Beat three eggs in a medium bowl.
  5. Drain potatoes and add to eggs. Add veggies. Add ~1 tbsp of grated Parmesan cheese (or other cheese). You could probably throw in some spices here, too (rosemary? basil?), although it didn’t occur to me until it was too late. Mix together and pour into a greased 9-inch round baking dish (I’m sure that the shape isn’t critical).
  6. The recipe said to bake for 12-15 minutes or “until golden brown”. It took 25 minutes to reach this stage, so my advice is to keep an eye on it and wait for the golden-brown-ness.
  7. Enjoy! Filling and tasty!

    (From The Little Big Vegetarian Book.)

« Newer entries · Older entries »