June 15th, 2010 at 10:36 pm (Crafts)
I have the simplest, lowest level of Netflix service: 2 DVDs per month, 1 out at a time. Even so, I can barely keep up with that rate of consumption, since I find so little time for movie watching! And even at just two DVDs per month, I feel a little sadness about waste every time I tear off the paper flap on the new DVD’s envelope and drop it in my recycling bin.
But no more! The folks at Netflix Origami have a bunch of origami designs specially adapted for use with the non-square Netflix flap. For example, there is the Elegant Swan. After following their very clear instructions, and step-by-step photos, I obtained this:

Netflix menagerie, here I come! Slowly!
3 Comments
2 of 2 people learned something from this entry.
May 29th, 2010 at 10:50 pm (Crafts, Engineering)
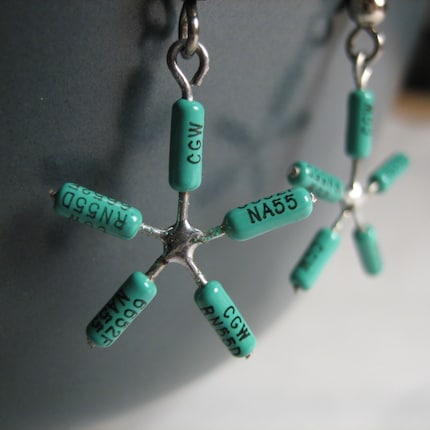
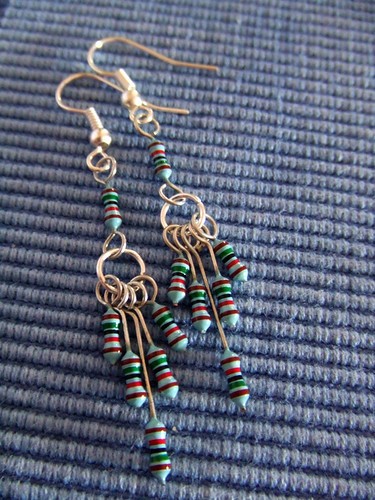
I always thought resistors had a certain chic appeal, with their banded color-codes. And so, during a recent trip to Radio Shack, I decided to pick up materials for making some ultra-geeky jewelry. It turns out that Radio Shack does still sell racks of electronic components, including resistors and capacitors.
Since I’ve never made any jewelry before, I appealed to a friend for a jewelry-making lesson. She’s made lots of her own necklaces, earrings, and bracelets, and showed up with books and magazines full of instructions and inspirations. She also brought lots of useful tools, mainly in the form of several different kinds of pliers and cutters. After playing around with the components a little to decide how to arrange them, we got to work.
 I learned how to shape the wires coming out of the ends of the components into little rings so they could be connected. I gripped the wire with the rounded pliers and used another pair to tightly wrap the wire into a circular shape. After snipping the end of the wire, I used the pliers again to bend the sharp, free end in towards the component so it wouldn’t poke or snag. While the tools are great, I can see that it takes some experience to get used to using them most effectively (I kept wanting to put them down and work with my less precise but more familiar fingers instead).
 My jewelry-crafting friend came up with the clever triangular arrangement and donated the hematite cubes that serve as the join point. The cubes didn’t have a hole large enough to pass both wires through, so we put one through and twisted the second one around the first, which was the most technically difficult part of this assembly.
We determined that the wires attached to the resistors and capacitors served quite well as jewelry wire, although apparently it is somewhat more flexible than is typical. However, I wouldn’t want to stick it in my ear (resistance wire is made from a nickel/chromium alloy which could irritate the skin of those with a nickel allergy), so we connected the earrings to sterling silver earwires.
Those are 1-μF capacitors. I wonder how many of my readers can specify the resistance of the resistors? (As a reference, here’s the resistor color code.) And in case you’re curious, here’s more info about how resistors actually work or how capacitors actually work.
Other cool ideas:

5 Comments
3 of 4 people learned something from this entry.
May 16th, 2010 at 11:11 pm (Books, Crafts, Philosophy)
This isn’t a book review, since I haven’t read the book yet. It’s more of a book preview. I’ve only had a chance to read the Introduction so far, but that alone already has me jittering with desire to dig in and dig deeply. It’s that good, and has that much content that speaks to me.
 Shop Class as Soul Craft, by Matthew Crawford, is a book that my friend Jim recommended long ago. I’m finally getting the chance to take a look for myself. It emphasizes the deep-down satisfaction that we gain from making (or fixing) things ourselves, with our own hands. More generally, it considers the nature of work, and what constitutes a meaningful occupation.
Here are some tidbits from the Introduction that resonated with me, or that I found particularly thought-provoking:
“Following a doctorate in political philosophy at the University of Chicago, I took a job as executive director of a Washington ‘think tank.’ I was always tired, and honestly could not see the rationale for my being paid at all—what tangible goods or services was I providing to anyone? The sense of uselessness was dispiriting. That pay was good, but it truly felt like compensation, and after five months I quit to open a bike shop.”
“This book grows out of an attempt to understand the greater sense of agency and competence I have always felt doing manual work, compared to other jobs that were officially recognized as ‘knowledge work.’ Perhaps most surprisingly, I often find manual work more engaging intellectually. This book is an attempt to understand why this should be so.”
“… I hope [this book] will speak to those who may be unlikely to go into the trades professionally but strive for some measure of self-reliance—the kind that requires focused engagement with our material things.”
“Those who work in an office often feel that, despite the proliferation of contrived metrics they must meet, their job lacks objective standards of the sort provided by, for example, a carpenter’s level, and that as a result there is something arbitrary in the dispensing of credit and blame.”
I’m hooked; bring on the soul craft!
4 Comments
1 of 3 people learned something from this entry.
July 31st, 2009 at 1:47 pm (Crafts, Planets)
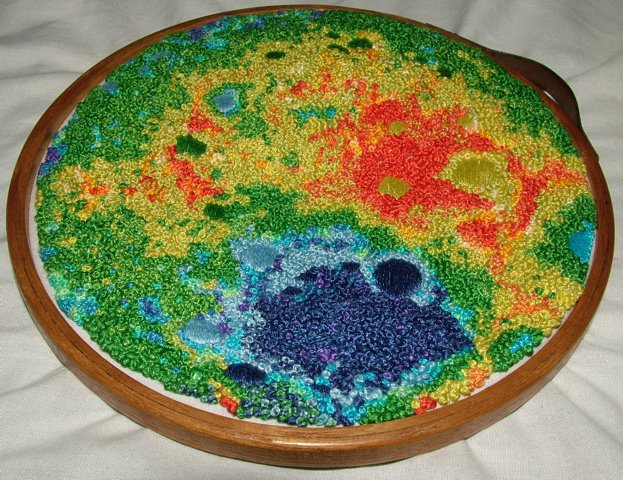
 I’ve dabbled a little in cross-stitch embroidery, but never tackled anything this spectacular. beche-la-mer was so inspired by a topographical map of the Moon that she decided to embroider it, in full color and texture. After just one month’s effort, she achieved her goal.
You can read more about the process at her blog:
I think it’s awesome that she chose the far side of the Moon to immortalize.

(Thanks for the pointer, Jim!)
Jim suggests that a Mars follow-on would be another fun project. I think this image, showing the Tharsis bulge, Olympus Mons, and Valles Marineris, could make a particularly fine work of art:

But oh, all those French knots! Maybe I’ll finish the sock I’m knitting first.
2 Comments
1 of 1 people learned something from this entry.
August 19th, 2007 at 11:07 am (Crafts)
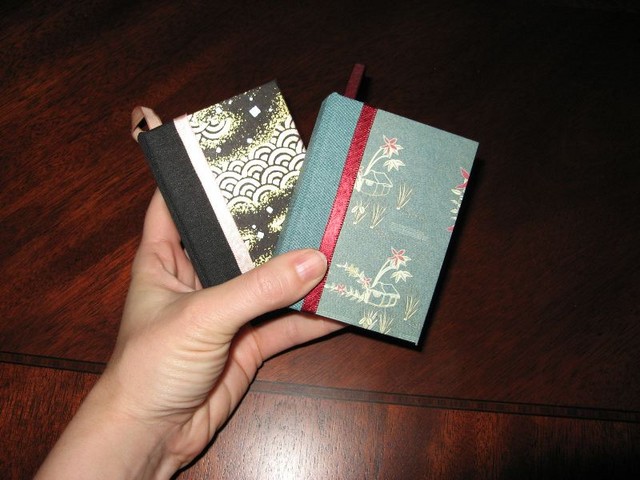
 I attended a Bookbinding class at Vroman’s, a local bookstore. In this four-hour course, we learned how to construct a simple binding and created two small examples (see right). The instructor provided us with paper “folios” (folded sheets in sets of six) and all of the other materials. We did the rest.
I took detailed notes on the process, but without step-by-step pictures it would be a very long entry indeed to convey all of the instructions. Instead, I’ll focus on the interesting tidbits I took away with me.
- The type of book we made is called a “codex”, which consists of multiple “signatures” (folios sewn through their folds into little six-sheet booklets). In our case, the signatures are sewn individually; I think traditionally they would all be connected with a single length of thread, which would increase the book’s cohesive strength. Our individually sewn signatures are connected by merit of some strong liquid glue and fabric-paper along the spine. In theory, a signature could fall (or be pulled) out due to this construction.
- Making the book casing was one of the most enjoyable parts of the process, since you get to pick a pretty colored paper to wrap around the boards for the cover. You fold the paper around the cardstock, mitring the corners, and then glue “end papers” (cardstock) on the inside edges to give it a finished look.
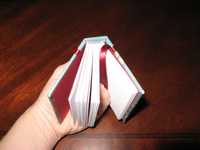
- The little colored strip at the top and bottom of the book’s binding (click image at right to enlarge) is just a bit of decorative tape, at least for the books we made. It doesn’t actually do anything for the binding.
- We finished by “embellishing” the books with ribbon trimming and (in my case) a ribbon bookmark that’s glued into the cover. Nothing like a built-in bookmark!
1 Comments
1 of 1 people learned something from this entry.