Replacing my car stereo
June 19th, 2011 at 8:28 pm (Electronics, Music)
I finally got sick of the cassette adapter I was using so that I could listen to my iPod Shuffle in my car and decided to upgrade my car stereo. It turns out that you can get a new base model for $60-70, which was much cheaper than I’d thought! (It really doesn’t take much to leapfrog the technology used in my car’s original 1999 stereo.) Then it’s just down to the investment of your own time to get it installed. (Given Evan’s offer to show me how it’s done, there was no way I was going to pay an installer to have all that fun!)
There were several new features that I wanted: a front AUX input, so I could plug my Shuffle in directly; a display that showed the title of the song currently playing from the radio; and a CD player. At Best Buy, the front AUX port and the CD drive were easy to spot on any stereo, but I couldn’t tell which ones would show song names. I asked the salesperson, who replied, “All of them.”
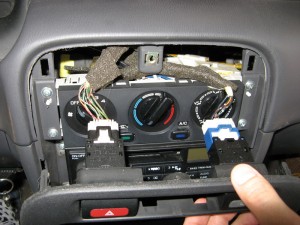
I picked out the base Pioneer model (1300MP), and a few days later we got together to install it. Evan figured out via google the easiest way to open up my console, and after detaching the wiring plugs for the hazard and rear defrost buttons, we had the stereo out:
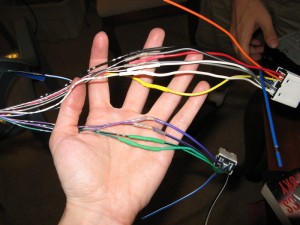
We opened the new stereo and commenced to connect its wires to a “wiring harness” that has plugs to fit the sockets provided by my 1999 Nissan Sentra. This meant stripping the ends of 11 wires and then soldering them to their corresponding wires in the harness. I experimented with my “less hazardous” lead-free silver solder, but ended up switching to Evan’s “wash hands before eating or smoking” lead solder, which works tons better. Prior to soldering, Evan threaded bits of heat-shrink tubes onto each wire, and after they were connected, we slid the heat-shrink up over the join and melted it with a device like a super-super-charged hair dryer. The tubes shrank to a neat fit onto the wires, yielding tidy connections that wouldn’t short against each other (stereo out of view on the left, wiring harness on the right):
We then wrapped electrical tape in spirals along the length of the wires to package them up prior to putting the stereo back into the car.
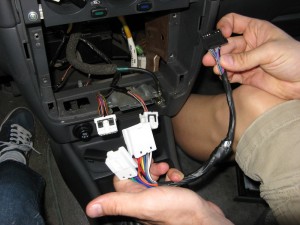
And with that, it was in! It took us about an hour and 15 minutes from start to finish.
I enjoyed the stereo for about 10 minutes until I realized that while the CD player and the AUX port worked fine, it didn’t display anything about the current song playing from the tuner. Arrrrgh! I pored through the manual and found no mention of this feature at all. So I went back to Best Buy where the installer tech informed me that this feature is called Radio Data System and that I needed to find a stereo with “RDS” listed as a feature. He assured me however that Best Buy would take the stereo back since I’d bought it thinking it had a feature it didn’t, even though I’d already installed it.
On Amazon, I found a base-model Sony car stereo (350MP) that does have RDS, and is slightly nicer all around than the Pioneer, for only $10 more. When that one arrived in the mail, I sat down, this time solo, to undo and redo the installation process. Getting the heat-shrink tubes off the wiring harness was a pain:
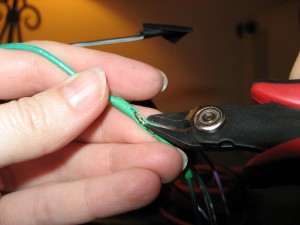
After a few of these I figured out that I could instead score the tube in the middle and twist/slide it away from the join, then desolder the connection and pull both tubes off. Then even that got tedious, so I started just cutting the wires and stripping them back a bit more to expose fresh surfaces on the wiring harness end. I put on new heat-shrink tubes, then soldered the new stereo to the harness wires and used my multimeter to check that all of the connections were good. I shrank the heat tubes, wrapped the connection in electrical tape, and put the stereo into the car. Interestingly, it wouldn’t power on until I also plugged in the antenna cable — leading me at first to suspect a flaw in my work. But no! All was good with everything connected.
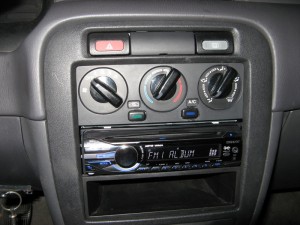
It was at about this point that I realized I’d left a CD in the stereo I’d just taken out of the car. At that point I was two hours in and not willing to remove the new Sony stereo, unsolder its connections, reconnect the Pioneer, eject the CD, undo its connections, and reconnect the Sony. So I called it a day and savored the Sony’s futuristic blue glow, dancing equalizer dots, advanced display, and Radio Data System.
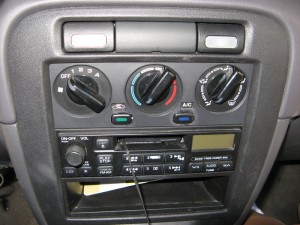
Old stereo… new stereo!
Epilogue:
- To avoid the hassle of soldering, apparently it is possible to use wire nuts (though they may not last as long) or a kind of wire-crimping device that is what Best Buy installers would use.
- When I took the Pioneer stereo back to Best Buy, they sadly were not willing to take the time to get my CD out of it (e.g., pull out the Pioneer display stereo, plug the one I had in, and eject the CD). So I ended up returning it with the CD inside. At that point, any route to recover the CD would cost far more (in money and/or time) than simply replacing it. I did try hooking up the yellow (+) and black (-) wires to a 12V power supply, but that had no effect, and I didn’t want to experiment further and kill the stereo in the process.
Katie said,
June 19, 2011 at 11:38 pm
I need to do this…My cassette adapter melted in the Moab heat last summer. From your photos of your dashboard dials and buttons, I am guessing that you drive the same car I do, too. : )
Terran said,
June 20, 2011 at 8:06 am
Nice work! I have to say that I’m a wimp about these things. I believe that I’m capable of installing a car stereo, but physical objects don’t do it for me. This kind of thing is pretty much why I fled from hardware after my undergrad. ;-)
Kiri said,
June 20, 2011 at 8:44 am
Katie, do you drive a Nissan Sentra? :)
Terran, I find this kind of thing so empowering! The car stereo is no longer a mystical gadget (well, less of one anyway). Also, after seeing how easy it is to get under the car panels, now I’m tempted to start taking more of my car apart. Who knows what treasures I might find that have fallen down into things and I thought forever lost? :)
Chris said,
July 6, 2011 at 5:26 pm
What CD did you lose?
Kiri said,
July 7, 2011 at 11:48 am
Regrettably, it was TMBG’s Here Comes Science. But I still have the DVD it came with :)
Chris said,
July 10, 2011 at 1:33 am
Too bad, that’s a good record.
I told my 12 year-old daughter about your adventures in car stereo replacement. I drive a 2003 Volvo S40 with a stock stereo. She asked why would I want a new stereo. I pointed to the (now seemingly whopping) space where the cassette loads and asked, “Do you know what that hole is for?” She thought for a second or two and said, “No.” “That’s why.”, I replied.
Love your blog. Thanks.
sig bat said,
July 4, 2013 at 11:02 pm
i decided to get a new stereo for my S3 too. i dismantled the unit yesterday(so i would have no excuse to get the new unit and set it up come weekend). i also did some research yesterday,on new unit’s wiring and found out that the wires are color coded, so things would be easy. minutes ago i decided to search “nissan stereo wiring” and found one of your images. thus, landing me to this site. thanks to you, i now believe this project would be easier than i thought. rock and roll!!!
Helen Pleasant said,
October 25, 2016 at 5:20 am
I am planning to change my car headunit. It does not provide good sound more. thanks for your great post.
It will help me when I will install a new headunit.
Steven said,
October 22, 2019 at 8:34 am
I got some good information about replacing of the car stereo. Its really help me when I need to change my car stereo.
Thanks for sharing such an informative post.
Charles Patterson said,
July 10, 2021 at 5:27 am
Thank you so much for sharing your experience. Can you please tell me, what cons you are facing when using Pioneer DEH Single DIN In-Dash CD Receiver?